Wednesday, September 7, 2016

SQL Injection security Vulnerability

This article i will be covering SQL Injection security vulnerability.

What is SQL Injection?
SQL Injection means, modifying application query in such a way that it tweaks the actual query results. With this issue present in application Hacker can easily manipulate the query and can gain access to application data and functionality.

How to address this issue?
There are many things which application developer can take care during the development phase which can avoid these issues.

  1. Usage of PreparedStatement while doing database operations.
  2. Usage of CallableStatement which is used to call database Procedures. 
  3. Input validations and Data Encoding.
  4. Database related constraints like, usage of proper grant, privilege, views etc.   
Below is simple example on how the attacker can use this vulnerability to exploit system.

Lets assume that in the web application there is login screen which prompts user to enter user credentials. 

In the application to validate the user following query is used.
SELECT USERNAME FROM USER WHERE PASSWORD='ABCD' AND USERNAME='ABCD' ;

and in java code this query is prepared using string concatenation operation something like shown below.
public String validateUser(String userName, String password){
 Statement stmt=null;
 String query="SELECT USERNAME FROM USER WHERE PASSWORD='"+password+"' AND USERNAME='"+userName+"'";
 stmt=con.createStatement();
 ResultSet res= stmt.executeQuery(query);

}
Now to exploit this limitation in the code,hacker can easily manipulate the query by passing additional query while login from the application login page and he can access the application without having valid user account. This can be done as shown below.

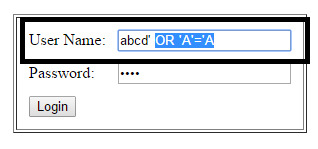

Application will receive the information from UI and it will prepare following query based on above java code.
SELECT USERNAME FROM USER WHERE PASSWORD='ABCD' AND USERNAME='abcd' OR 'A'='A' ;

Once above query is executed by database, even if the hacker enters the wrong user name and password, he is able to get into the system, as the condition "OR 'A"='A"" always returns true. This value hacker passed from UI and application blindly accepts this value and prepares the query.

This is one of the kind of exploitation which hacker can do if application is vulnerable to SQL Injection.

to address this issue one of the simple solution is to migrate to PreparedStatement. But there are situations where this migration is not very straight forward when application team doesnot want to modify legacy codes. Then other approaches can be taken up like escaping/encoding the user input and append those value in sql queries.

Prepared Statement Approach:
Below is the sample code which will remove the SQL injection issue. There are ORM framework available which can be used in the application and these framework takes care of all these standards. like, MyBatis, Hibernate, Spring DAO etc.
public String validateUser(String userName, String password){
 String query="SELECT USERNAME FROM USER WHERE PASSWORD=? AND USERNAME=?";
 PreparedStatement stmt=connection.prepareStatement(query);
 stmt.setString(1,password);
 stmt.setString(2,userName);
 ResultSet res= stmt.executeQuery();
}
I hope this explanation helps to understand the SQL injection issue.


Parallel AJAX calls


Consider a scenarios where you have multiple source of data and that needs to be consolidated in the UI and presented to the users. There can be different ways to implement this. One option can be using AJAX approach. JQuery provides a way to initiate parallel AJAX calls. In this blog i will be showing a sample code to achieve same.

Using Jquery provided "$.when" function, which provides a way of executing asynchronous events. $.when takes asynchronous ajax events as a parameter, and the output of these AJAX events will return in ".then" in the same order.

$.when(ajax1, ajax2,....).then(resp1,resp2,....);


Following is the sample code to make parallel ajax call.
var url1="http://localhost:8080/url1";
var url2="http://localhost:8080/url2";
var param="s=abcd";

$.when(
 $.ajax({timeout:10000,error:function(){handleErrorScenario();},type: "get",
   url:url1, async : true, data:param}),
     $.ajax({timeout:10000,error:function(){handleErrorScenario();},type: "get",url:url2,
   cache: true,async : true, data:param})
 )
 .then(function(url1Resp, url2Resp){
    
 if(!url1Resp || !url2Resp){
  handleErrorScenario();//define this function.
 }else{
  handleSuccessScenario(url1Resp, url2Resp); //define this function.
 }
}

In the above sample there are two AJAX function which are passed as parameter. url1Resp and url2Resp will hold the output from the call. Code inside ".then" will be only executed when all the deferred AJAX response comes back. Some of the function needs to be defined in the your code. I am using them as dummy reference.

Monday, September 5, 2016

Using Apache CXF initiate SOAP call

IN this blog i will be showing how to consume SOAP webservice in java by generating Client code using Apache CXF.

Prerequisites for this blog are as follows.
  1. Eclipse Mars
  2. Java
  3. Apache CXF
  4. WSDL file for any SOAP webservice.
Install CXF

Apache CXF can be downloaded from "CXF". After downloading setup, unzip it in your system. 

Configure cxf in eclipse. 

Go to Windows - Preferences - Webservice - CXF 2.0 Preferences

Then select CXF Runtime - click on Add - Specify CSF installed location - Click on Finish.

I have highlighted the steps with blocks in below screen shot.

Setting Up CXF in Eclipse

Create Web Project or Paste WSDL in existing project.

After configuring you need create Project in eclipse, or if you are using it in existing project then paste the WSDL file which you have received from service provider.

Next step will be to generate the client code

Right click on wsdl file, Go to - Webservice - Generate Client

Webservice Client popup will come, next specify the Configuration by clicking on the "Webservice runtime" link. In the Client configuration popup select "Apache CXF 2.x". Click OK.

Click next button, specify the package incase it needs to be changed. Otherwise keep everything default and finish the steps.

Steps to create Client Code

Once the client code
is generate. Following are the important note, which will help you in quick startup.
  •  Locate file which has name with *_Client.java. This is sample client code which is generated by CXF. This shows invocation steps.
  • Locate file which extends "javax.xml.ws.Service", this is the main service class which will be utilized in invoking the service.


  GlobalWeather ss = new GlobalWeather();
  GlobalWeatherSoap port = ss.getGlobalWeatherSoap();  
  java.lang.String _getCitiesByCountry__return = port.getCitiesByCountry("Country Name");
  System.out.println("getCitiesByCountry.result=" + _getCitiesByCountry__return);
Incase you need to override the end point url, following code can be used to override the end point url.
  GlobalWeather ss = new GlobalWeather();
  GlobalWeatherSoap port = ss.getGlobalWeatherSoap();  
 
//code to override the end point
  BindingProvider bp = (BindingProvider) port;
  bp.getRequestContext().put(BindingProvider.ENDPOINT_ADDRESS_PROPERTY,
    "NEW URL");

  java.lang.String _getCitiesByCountry__return = port.getCitiesByCountry("Country Name");
  System.out.println("getCitiesByCountry.result=" + _getCitiesByCountry__return);

Saturday, September 3, 2016

Cross domain Calls in AJAX with Jsonp

Web browser doesnot allow initiating cross domain call from javascript. There are multiple ways to initiate cross domain calls, I will be showing example on how to make cross domain call from javascript using jsonp.


Using Jquery following is the way to initiate Cross Domain call.

in $.ajax method, "dataType" parameter should be set to "jsonp", here jsonp means Json with padding, with jsonp a javascript code
is injected in client browser, which enables code to make cross domain call.


function initiateCrossDomainCall(url) {
 $.ajax({
     dataType: 'jsonp', // json with padding
     type:"GET",
            url : url,
            success: function ( data) {
             parseResp(data);
            },
     error: function ( data, status, error) {
  parseErrorResp(data, status, error)
     },
            timeout: 2000
  });
}
function parseResp(data){
 //add code to parse responsedata.
}
function parseErrorResp(data, status, error){
 // parse errr response.
}

Basically when above javascript call is initiated from client, and dataType is mentioned as JSONP, then jquery by default adds a parameter to the url. parameter name will be "callback" and name of the method will dynamically generated by jquery. Server response should be wrapped inside this method.. e.g. in the below url call, you can see the callback=jQuery11230083279708298031_1472922945432, "jQuery11230083279708298031_1472922945432" this is the function name in which response should be wrapped and sent back from the server side code.

http://localhost:8080/location?callback=jQuery11230083279708298031_1472922945432&_=1472922945433

Incase if custom callback method is defined in $.ajax method then jquery will send that method name in the "jsonpCallback" parameter. something like this. jsonpCallback:'handleResp' in the url call you can see the callback=handleResp is passed.

http://localhost:8080/location?callback=handleResp&_=1472922945433

To make the server side code support jsonp approach, following should be the logic on server side code. Sample code in java with spring. but this can be done in any framework with similar output.
@RequestMapping(value="/location", method=RequestMethod.GET)
public @ResponseBody String returnLocation(HttpServletRequest request){
 //reading callback paarameter
 String callback = request.getParameter("callback");
 StringBuilder sb=new StringBuilder();
//preparing response based on if callback parameter is present or not.
 if(callback!=null){
  //appending callback method name and adding json response inside that method.
 sb.append(callback).append("(").append("{\"location\":").append("BL").append("})");
 }else{
 sb.append("{\"location\":").append("BL").append("}");
 }
 return sb.toString();
}
following is the response from the server to the jsnop call.

  jQuery11230083279708298031_1472922945432({"location":"BL"})

 once the client browser receives the above response it calls back the success block of the $.ajax function and executes either "parseResp" or "parseErrorResp" method based on success or error.

that is all from jsonp.

Creating Exception Handler in Spring

In this blog i will show how to create Exception handler in Spring. I assume that you already have Spring application setup and it is running. Exception handling is one of the piece which gets ignored and in latter stages of the development it becomes unmanageable task. There will not be a consistent and common approach if it is not taken up at the beginning stages. Spring framework makes developers life pretty simple with the api which it provides for Exception handling at global/application level. Nice thing about this approach is that it becomes a single place for handling all the exception and becomes more manageable.

In this example i will be creating MyAppExceptionHandler. This will be single class which will be responsible for handling any exception scenario.

to start with create a class "MyAppExceptionHandler" this needs to implement an interface named "HandlerExceptionResolver" and "Ordered". Implement the default method which your IDE will ask you to implement.

Ensure that this class is annotated with @Component, otherwise spring will not recognize it as Bean component and it will not be loaded by framework. You can choose xml configuration as well instead of annotation.

Below is the method from "HandlerExceptionResolver" interface.
public ModelAndView resolveException(HttpServletRequest request, HttpServletResponse response,
 Object handler, Exception ex)
This method will handle the exception call from framework. It returns View, which can be a jsp file with custom error message. which will be shown to the user.

Following method from the interface Ordered
public int getOrder()
To manage the placement of exception handler implementation in queue, this method is usefull. If we use Integer.MIN_VALUE, it will put this class in front of the queue for resolving exceptions. If this method is not overrided then this class will not be the first class to be called for handling exception.

below is the sample class file example.

package com.sample.exception;

import javax.servlet.http.HttpServletRequest;
import javax.servlet.http.HttpServletResponse;

import org.springframework.core.Ordered;
import org.springframework.stereotype.Component;
import org.springframework.web.servlet.HandlerExceptionResolver;
import org.springframework.web.servlet.ModelAndView;

@Component
public class MyAppExceptionHandler implements HandlerExceptionResolver, Ordered{
 @Override
 public int getOrder(){
  return Integer.MIN_VALUE;
 }
 @Override
 public ModelAndView resolveException(HttpServletRequest request, HttpServletResponse response,
 Object handler, Exception ex){
  ModelAndView view;
  if(ex instanceof IOException){
   response.setStatus("500");
   view = new ModelAndView();
   view.addObject("message", ex.getMessage());
   view.setViewName("error");
  } else{
   response.setStatus("400");
   view = new ModelAndView("error")
   view.addObject("message",
     "Oops, Unknown Technical error has occurred.");
  }
  return view;
 }
}

error.jsp page code is as mentioned below.
<%@ taglib uri="http://java.sun.com/jsp/jstl/core" prefix="c"%>
<!DOCTYPE html>
<html>
<head>
<title>Error Page</title>
</head>
<body>
 <h1> ${message} </h1> 
</body>
</html>
error.jsp page code is as mentioned below.

That's it, now you are good to go. Thanks

Friday, September 2, 2016

Configure SonarQube with Jenkins

   Jenkins provides easy integration with different kinds of plugins which are helpful in overall improvement and management of development life cycle and code quality. One of such plugin is SonarQube.

    SonarQube is code quality analysis software. It runs through the code and identifies code quality issues. It has got web portal where you can generate different kinds of reports like

  1. Technical Debt
  2. Code Issue, with actual code linkage.
  3. Different types of reports.
  4. Maintains the history of issue details. Can check increase and decrease.
  5. Rules configuration.
  6. Quality Gates
  7. Code duplication
  8. and Many others.
    There is provision in Jenkins to integrate this plugin, which can be executed during the building of applications. Also there is option of failing the build process if the code quality does not match the defined quality gate in Sonar.

  Now i will show how to integrate this plugin with Jenkins. Assumption is that Jenkins is installed in your system. 

  To start first you need to download sonar server in your system or if it already installed and running then you can skip this step.

If Sonar is not installed then follow these steps.
  1. Download SonarQube from the link.
  2. After download, unzip the file in your system.
  3. Then to start SonarQube server, navigate to "SONAR_HOME/bin".
  4. Based on your environment, go to specific folder.
  5. I am using "windows-x86-64" as i am having Windows, 64Bit system. 
  6. Click on "StartSonar.bat" to start the sonar server.
  7. Sonar server should start, and you will see new command prompt window opening for you.
  8. Sonar can be added into window service as well if you are system admin. There batch files present in same folder.
  9. Access the SonarQube in WebBrowser by entering url: "http://localhost:9000/"
  10. Empty dashboard page of sonar server if it is fresh installation.
  11. Once page is launched, it means that sonar is installed and running fine.
  12. Please note this server url will be used in Jenkins when we install SonarQube plugin in coming sections below.
following message in the console tell if sonar server is up and running.
jvm 1    | 2016.08.30 23:02:43 INFO  app[o.s.p.m.Monitor] Process[web] is up


Now coming back to configuring SonarQube in Jenkins.

1. Access jenkins portal by accessing "http;//localhost:8080" url in browser.

2. Go to --> Manage Jenkins menu in left navigation. Then click on "Manage Plugins",


3. Navigate to "Available" Tab, in the "Filter" option, type "SonarQube", you will see "SonarQube Plugin" listed below, select the checkbox and click on "Download now and install after restart" button.


4. Following screen will be shown, restart Jenkins, plugin will be installed and it can be verified in installed Tab under Manage Plugin page.


5. After installation next step will configure SonarQube Plugin.

6. Navigate to "Manage Jenkins" --> "Configure System", look for section named "SonarQube", as shown below.

7. Provide basic  details, like Name, and Server Url, This URL should be the url for SonarQube Server which we installed above.


8. Once the global configuration is complete, next step will be to configure SonarQube for a specific projects. I will show next.

9. Navigate to Jenkins Home, by clicking on Jenkins menu in horizontal menu bar.

10. Next click on "New Item", you will get following screen, provide details of the project. Here we are creating new project which will be mapped to a java project.

  • Item Name
  • Select Freestyle Project
Click on OK button.


11. It will launch detailed project screen, where project related information can be configured, like SCM, and other configuration. These points is out of scope of this blog.

12. Now to add Sonar configuration to the project, click on "Add Build Step" and click on "Invoke Standalone SonarQube Analysis" menu. it will expand a new section specific to SonarQube configuration.


13. Provide the details for project configuration related to sonar server.

Values inside "Analysis properties" are important for sonar server.

  • sonar.projectKey - This will be used to uniquely identify project in sonar server, ensure that this does not repeat if you have multiple project in Sonar Server. Otherwise it will override the project data.
  • sonar.projectName - Project will be given in sonar server.
  • sonar.projectVersion - Usefull in maintaining history of the changes.
  • sonar.sources - folder where source code files are present.
  • sonar.language- language of the source code.


14. Once values are entered, then click on "Save" button.
15.  Now setup is complete for the project.
16. Next is to start Build process and verify if sonarqube analysis is getting triggered or not. Click on "Build Now" in project left navigation.


17. Once build starts, then monitor the logs in Jenkins console. You will see following logs. this mean SonarQube analysis is getting triggered and it is getting tracked in sonar server also.


18. To check project in SonarQube server, navigate with following link given in above console. you will see below screen.


That is all which needs to be done for configuring sonarqube in jenkins.

Thursday, September 1, 2016

Enable CSRF in Spring Security

In this blog I will show you steps which is needs to enable CSRF in spring application.

CSRF mean "Cross Site Request Forgery". If your application is vulnerable to this security issue, then it will allow malicious user to submit the forged/malicious request to the application and successfully completes it. Check OWASP Website page for detailed understanding about CSRF.

Enabling CSRF will not allow submitting forged request and do the transaction. This happens with CSRF token value which is submitted with all the request. It is difficult for malicious user to guess this value and submit with the request. CSRF token is autogenerated value which keeps changing. Also a reference of that token is maintained on server side for identifying valid request.

Please note i am using spring 4.x version for this blog.

Step1: 
Open web.xml file in WEB-INF folder, and add following line. 
<filter>
 <filter-name>securityFilterChain</filter-name>
 <filter-class>org.springframework.web.filter.DelegatingFilterProxy
 </filter-class>
</filter>
<filter-mapping>
 <filter-name>securityFilterChain</filter-name>
 <url-pattern>/*</url-pattern>
</filter-mapping>

Here  /* in url-pattern means that all the url patterns will be covered.

Step2: In this step we will do changes in applicationContext.xml, which contains security configuration details. Add below code to enable,

<security:http auto-config="true" use-expressions="true">
<security:access-denied-handler  error-page="/htm/denied.html" />
<security:form-login 
    login-page="/login" 
 authentication-failure-url="/login" 
 username-parameter="UserName"
 password-parameter="Password" />
<security:csrf  disabled="false"/>
</security:http>

Incase if you already having http tag then you need to add  <security:csrf disabled="false"/> . By default csrf is enabled so it is not required to add "disabled=false" attribute.  I added as it is easy to understand.

Adding csrf will inform spring to provide application necessary setup to use csrf while submitting request.

Basically anything action which changes the state in application should be covered. Generally GET method is not used for any changes in application data. But incase if your application uses GET for change operation then that also should be covered.

Incase if you need to specify methods/url's which should be scanned by spring for CSRF, then use following "request-matcher-ref" attribute of csrf tag. I will not covering this here in this blog.

<security:csrf  disabled="false" request-matcher-ref="ref of class"/>

hello
In the JSP page add following code in the form.

<input name="${_csrf.parameterName}" type="hidden" value="${_csrf.token}" />

This will generate a tag for CSRF and spring will take care of verifying the token for the submitted request. Token value can be passed either by hidden field or as URL parameter.

Following value will be visible in view source of page, if you are able to generate the CSRF token.


If the token is invalid then spring will throw invalid CSRF token was sent and will take user to error page. Application will throw "InvalidCsrfTokenException".

Note, if you using AJAX with Json parameter, then you can submit CSRF token as http parameter, you need to use either meta tags to pass this information to the application. As shown below.

    <meta name="_csrf" content="${_csrf.token}"/>
    <meta name="_csrf_header" content="${_csrf.headerName}"/>
Or include it all the ajax calls, by having below function in the jsp or view file.
$(function () {
    var token = $("meta[name='_csrf']").attr("content");
    var header = $("meta[name='_csrf_header']").attr("content");
    $(document).ajaxSend(function(e, xhr, options) {
        xhr.setRequestHeader(header, token);
    });
});
That is all on CSRF front.

Wednesday, August 31, 2016

Configure Quality Gates in SonarQube Server

In this blog i will show how to configure Quality Gates in SonarQube server.

What is Quality Gate?
   Quality Gate is combination of various conditions, against which SonarQube server measures project quality thresholds. There are different categories/severity of issue which sonar reports, like Critical, Blocker, Major, Code Coverage, blocker issues since last build and many others.

Before I explain further, let me explain when need arises to create custom quality gates.

   Sonarqube works with many technologies, all these technologies will have different standard and process. And measuring criteria can't be same for all these applications, in such scenarios different Quality Gates will be needed for each of these projects/application.

   Now moving on with the Quality Gate creation process.

   Login to SonarQube server, for me it is hosted at "http://localhost:9000/", incase it defers then access the url on which sonarqube server is hosted.

  Login to sonarqube portal, click on Menu "Quality Gates" in top menu bar.


Sonar will show default Quality Gate which comes with Sonar setup.

To create new Quality Gate, click on "Create" button in left navigation. Enter quality gate name and click on Create button in the popup.


Click on "Add Condition" drop down and select the appropriate metrics specific to project requirement.


after adding the conditions, select following details for each row.


  • First Drop Down - select the value
  • Second Drop Down - select the condition
  • Warning Field Value- value
  • Error Field Value - enter value
Next will click on "Add" button. It will add the metrics to QualityGate. There are many metrics which is provided in the dropdown, select based on the project needs.


After above step, project needs to be associated to Quality Gate.

In below project display area on the same screen, search for the project and select the checkbox, which will associate the project to created Quality Gate.


This is last step in creation of Custom Quality Gate.

For the above project if new build is initiated then it will validate the project against this quality gate. That can be verified in logs.


Configure SonarQube with Jenkins

   Jenkins provides easy integration with different kinds of plugins which are helpful in overall improvement and management of development life cycle and code quality. One of such plugin is SonarQube.

    SonarQube is code quality analysis software. It runs through the code and identifies code quality issues. It has got web portal where you can generate different kinds of reports like

  1. Technical Debt
  2. Code Issue, with actual code linkage.
  3. Different types of reports.
  4. Maintains the history of issue details. Can check increase and decrease.
  5. Rules configuration.
  6. Quality Gates
  7. Code duplication
  8. and Many others.
    There is provision in Jenkins to integrate this plugin, which can be executed during the building of applications. Also there is option of failing the build process if the code quality does not match the defined quality gate in Sonar.

  Now i will show how to integrate this plugin with Jenkins. Assumption is that Jenkins is installed in your system. 

  To start first you need to download sonar server in your system or if it already installed and running then you can skip this step.

If Sonar is not installed then follow these steps.
  1. Download SonarQube from the link.
  2. After download, unzip the file in your system.
  3. Then to start SonarQube server, navigate to "SONAR_HOME/bin".
  4. Based on your environment, go to specific folder.
  5. I am using "windows-x86-64" as i am having Windows, 64Bit system. 
  6. Click on "StartSonar.bat" to start the sonar server.
  7. Sonar server should start, and you will see new command prompt window opening for you.
  8. Sonar can be added into window service as well if you are system admin. There batch files present in same folder.
  9. Access the SonarQube in WebBrowser by entering url: "http://localhost:9000/"
  10. Empty dashboard page of sonar server if it is fresh installation.
  11. Once page is launched, it means that sonar is installed and running fine.
  12. Please note this server url will be used in Jenkins when we install SonarQube plugin in coming sections below.
following message in the console tell if sonar server is up and running.
jvm 1    | 2016.08.30 23:02:43 INFO  app[o.s.p.m.Monitor] Process[web] is up


Now coming back to configuring SonarQube in Jenkins.

1. Access jenkins portal by accessing "http;//localhost:8080" url in browser.

2. Go to --> Manage Jenkins menu in left navigation. Then click on "Manage Plugins",


3. Navigate to "Available" Tab, in the "Filter" option, type "SonarQube", you will see "SonarQube Plugin" listed below, select the checkbox and click on "Download now and install after restart" button.


4. Following screen will be shown, restart Jenkins, plugin will be installed and it can be verified in installed Tab under Manage Plugin page.


5. After installation next step will configure SonarQube Plugin.

6. Navigate to "Manage Jenkins" --> "Configure System", look for section named "SonarQube", as shown below.

7. Provide basic  details, like Name, and Server Url, This URL should be the url for SonarQube Server which we installed above.


8. Once the global configuration is complete, next step will be to configure SonarQube for a specific projects. I will show next.

9. Navigate to Jenkins Home, by clicking on Jenkins menu in horizontal menu bar.

10. Next click on "New Item", you will get following screen, provide details of the project. Here we are creating new project which will be mapped to a java project.

  • Item Name
  • Select Freestyle Project
Click on OK button.


11. It will launch detailed project screen, where project related information can be configured, like SCM, and other configuration. These points is out of scope of this blog.

12. Now to add Sonar configuration to the project, click on "Add Build Step" and click on "Invoke Standalone SonarQube Analysis" menu. it will expand a new section specific to SonarQube configuration.


13. Provide the details for project configuration related to sonar server.

Values inside "Analysis properties" are important for sonar server.

  • sonar.projectKey - This will be used to uniquely identify project in sonar server, ensure that this does not repeat if you have multiple project in Sonar Server. Otherwise it will override the project data.
  • sonar.projectName - Project will be given in sonar server.
  • sonar.projectVersion - Usefull in maintaining history of the changes.
  • sonar.sources - folder where source code files are present.
  • sonar.language- language of the source code.


14. Once values are entered, then click on "Save" button.
15.  Now setup is complete for the project.
16. Next is to start Build process and verify if sonarqube analysis is getting triggered or not. Click on "Build Now" in project left navigation.


17. Once build starts, then monitor the logs in Jenkins console. You will see following logs. this mean SonarQube analysis is getting triggered and it is getting tracked in sonar server also.


18. To check project in SonarQube server, navigate with following link given in above console. you will see below screen.


That is all which needs to be done for configuring sonarqube in jenkins.

Saturday, August 27, 2016

How to change log level in logback at runtime

Here i am going to show how to change the log level in logback logging api at runtime.

Following are the possible log level available in logback.
  • TRACE
  • DEBUG
  • INFO
  • WARN
  • ERROR
Below is the set of code if it gets executed will changes the level to the one it is being set. First retrieve the LoggerContext using LoggerFactory, then retrieve the root logger or you can retrieve any specific logger as well. After getting the rootLogger then call setLevel method to specify the new log level.
  LoggerContext loggerContext = (LoggerContext)LoggerFactory.getILoggerFactory();
  Logger rootLogger = loggerContext.getLogger(Logger.ROOT_LOGGER_NAME);
  ((ch.qos.logback.classic.Logger) rootLogger).setLevel(Level.DEBUG);

Wednesday, August 24, 2016

Setting in Tomcat to enable SSL for certain pages

Use following setting in your web application to enable SSL for certain pages.


For example:
Certain page in the application should be accessible on https, like

SSL:

Non SSL:

This setting can be enabled at application level by specifying appropriate configuration in deployment descriptor file i.e. web.xml.

Open web.xml located inside WEB-INF folder in application. Add following code

<security-constraint>
    <web-resource-collection>
        <web-resource-name>Non SSL</web-resource-name>        
        <url-pattern>/help</url-pattern>
  <url-pattern>/contact</url-pattern>
    </web-resource-collection>    
    <user-data-constraint>
        <transport-guarantee>NONE</transport-guarantee>
    </user-data-constraint>   
</security-constraint>
<security-constraint>
    <web-resource-collection>
        <web-resource-name>SSL</web-resource-name>        
        <url-pattern>/*</url-pattern>
    </web-resource-collection>    
    <user-data-constraint>
        <transport-guarantee>CONFIDENTIAL</transport-guarantee>
    </user-data-constraint>
</security-constraint>

url-pattern - here you need specify the url pattern to be considered.

transport-guarantee - value in this tag manages if the mentioned url under url-pattern should be under SSL or Non SSL. if "CONFIDENTIAL" value is specified then it will be secure otherwise non SSL.


Components of Big Data - Hadoop System

In this blog i will explain important components which are part of Hadoop System. I will give very brief overview of these components. Be...