This blog shows how to setup Basic Authentication in Web application.
I am using Spring based Web Service to demonstrate the same. To start please ensure that you have spring application configured properly. On top of that i will show what changes needs to be be made to enable Basic Authentication.
Securing application is one of the important activity which developer and designer has to keep in mind while designing. Basic authentication can be one of the basic security mechanism which can be enabled to secure web application or web service.
Basic Authentication security is where application will expect the consumer to pass User and password in request header. In case if these values are not passed then spring framework will throw back Unauthorized error code.
Following are the steps which needs to be followed.
Step1:
Add the spring security jar files in the application. Following are the jar files.
cccc
Here is the explanation of the tags:
<http> - Main tag which is responsible for creating proxy for all the url which this tags intercepts.
<intercept-url> - this tag is for specifying the url's which needs to be behind access control and which doesnot need to have access control. Using attribute pattern you can specify Url pattern and access attribute specifies what access check needs to be implemented.
<http-basic> - This tag informs proxy that it needs to alert user to enter user and password when url is accessed. This adds a BasicAuthenticationFilter and BasicAuthenticationEntryPoint to the configuration.
<authentication-manager> - here type of authentication is specified, in above example i have used configuration based authentication, which means that user details are hardcoded in the same xml files.
Step4:
Create Java file for testing the following implementation. Below is the web service component which is behind basic authentication security.
Step5:
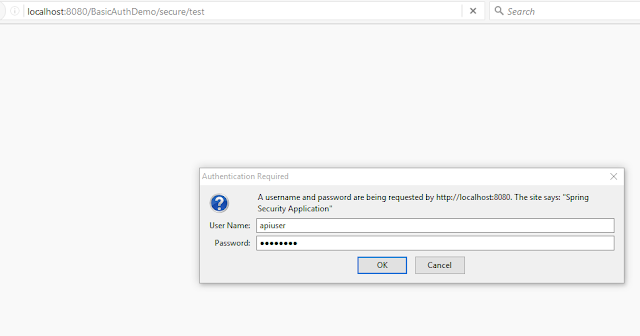
Start the server and test the functionality. Browser will prompt you to enter user details as shown below.
I am using Spring based Web Service to demonstrate the same. To start please ensure that you have spring application configured properly. On top of that i will show what changes needs to be be made to enable Basic Authentication.
Securing application is one of the important activity which developer and designer has to keep in mind while designing. Basic authentication can be one of the basic security mechanism which can be enabled to secure web application or web service.
Basic Authentication security is where application will expect the consumer to pass User and password in request header. In case if these values are not passed then spring framework will throw back Unauthorized error code.
Following are the steps which needs to be followed.
Step1:
Add the spring security jar files in the application. Following are the jar files.
- spring-security-core.jar
- spring-security-config.jar
- spring-security-web.jar
Step2:
Add following line in "Web.xml" file to enable spring security filter. This filter is responsible for adding security to the url pattern mentioned.
Also add an entry for security xml file which we will configure in next step, this file contain basic authentication security configuration.
Code is highlighted below.
Also add an entry for security xml file which we will configure in next step, this file contain basic authentication security configuration.
Code is highlighted below.
<servlet>
 <servlet-name>basicauth</servlet-name>
 <servlet-class>org.springframework.web.servlet.DispatcherServlet</servlet-class>
 <load-on-startup>1</load-on-startup>
</servlet>
<servlet-mapping>
 <servlet-name>basicauth</servlet-name>
 <url-pattern>/</url-pattern>
</servlet-mapping>
<listener>
 <listener-class>org.springframework.web.context.ContextLoaderListener</listener-class>
</listener>
<context-param>
 <param-name>contextConfigLocation</param-name>
 <param-value>
           /WEB-INF/basicauth-servlet.xml,
           /WEB-INF/basicauth-security.xml
        </param-value>
</context-param>
<!-- Spring Security -->
<filter>
 <filter-name>springSecurityFilterChain</filter-name>
 <filter-class>org.springframework.web.filter.DelegatingFilterProxy</filter-class>
</filter>
<filter-mapping>
 <filter-name>springSecurityFilterChain</filter-name>
 <url-pattern>/*</url-pattern>
</filter-mapping>
Step3:
Create spring-security.xml file and add following code to enable the security for those url to which security needs to be enabled.
<?xml version="1.0" encoding="UTF-8" ?>
<beans xmlns="http://www.springframework.org/schema/beans"
 xmlns:xsi="http://www.w3.org/2001/XMLSchema-instance"
 xmlns:oauth="http://www.springframework.org/schema/security/oauth2"
 xmlns:context="http://www.springframework.org/schema/context"
 xmlns:sec="http://www.springframework.org/schema/security"
 xmlns:mvc="http://www.springframework.org/schema/mvc"
 xsi:schemaLocation="http://www.springframework.org/schema/security/oauth2
 http://www.springframework.org/schema/security/spring-security-oauth2-2.0.xsd
 http://www.springframework.org/schema/mvc
 http://www.springframework.org/schema/mvc/spring-mvc-3.2.xsd
 http://www.springframework.org/schema/security
 http://www.springframework.org/schema/security/spring-security-3.2.xsd
 http://www.springframework.org/schema/beans
 http://www.springframework.org/schema/beans/spring-beans-4.1.xsd
 http://www.springframework.org/schema/context
 http://www.springframework.org/schema/context/spring-context-4.1.xsd ">
<http auto-config="true"  use-expressions="true" xmlns="http://www.springframework.org/schema/security">
    <intercept-url pattern="/login" access="permitAll" />
    <intercept-url pattern="/**" access="hasRole('ROLE_USER')" />
    <http-basic />
</http>
<authentication-manager alias="authenticationManager" xmlns="http://www.springframework.org/schema/security">
  <authentication-provider >
    <user-service>
      <sec:user name="apiuser" password="password" authorities="ROLE_USER"/>
    </user-service>
  </authentication-provider>
</authentication-manager>
</beans>
cccc
Here is the explanation of the tags:
<http> - Main tag which is responsible for creating proxy for all the url which this tags intercepts.
<intercept-url> - this tag is for specifying the url's which needs to be behind access control and which doesnot need to have access control. Using attribute pattern you can specify Url pattern and access attribute specifies what access check needs to be implemented.
<http-basic> - This tag informs proxy that it needs to alert user to enter user and password when url is accessed. This adds a BasicAuthenticationFilter and BasicAuthenticationEntryPoint to the configuration.
<authentication-manager> - here type of authentication is specified, in above example i have used configuration based authentication, which means that user details are hardcoded in the same xml files.
Step4:
Create Java file for testing the following implementation. Below is the web service component which is behind basic authentication security.
package com.infoblog;

import org.springframework.stereotype.Controller;
import org.springframework.web.bind.annotation.RequestMapping;
import org.springframework.web.bind.annotation.RequestMethod;
import org.springframework.web.bind.annotation.ResponseBody;


@Controller
@RequestMapping(value="/secure")
public class SecureController {

 @RequestMapping(value="/test", method=RequestMethod.GET)
 public @ResponseBody String secureFunction(){

  return "Success";
 }

}
Step5:
Start the server and test the functionality. Browser will prompt you to enter user details as shown below.


