Showing posts with label Web. Show all posts

Saturday, October 1, 2016

Basic Authentication Setup Java Web Application

This blog shows how to setup Basic Authentication in Web application.

I am using Spring based Web Service to demonstrate the same. To start please ensure that you have spring application configured properly. On top of that i will show what changes needs to be be made to enable Basic Authentication.

Securing application is one of the important activity which developer and designer has to keep in mind while designing. Basic authentication can be one of the basic security mechanism which can be enabled to secure web application or web service.

Basic Authentication security is where application will expect the consumer to pass User and password in request header. In case if these values are not passed then spring framework will throw back Unauthorized error code.

Following are the steps which needs to be followed.

Step1:

Add the spring security jar files in the application. Following are the jar files.
  • spring-security-core.jar
  • spring-security-config.jar
  • spring-security-web.jar
Step2:

Add following line in "Web.xml" file to enable spring security filter. This filter is responsible for adding security to the url pattern mentioned.
Also add an entry for security xml file which we will configure in next step, this file contain basic authentication security configuration.

Code is highlighted below.

<servlet>
 <servlet-name>basicauth</servlet-name>
 <servlet-class>org.springframework.web.servlet.DispatcherServlet</servlet-class>
 <load-on-startup>1</load-on-startup>
</servlet>
<servlet-mapping>
 <servlet-name>basicauth</servlet-name>
 <url-pattern>/</url-pattern>
</servlet-mapping>
<listener>
 <listener-class>org.springframework.web.context.ContextLoaderListener</listener-class>
</listener>
<context-param>
 <param-name>contextConfigLocation</param-name>
 <param-value>  
           /WEB-INF/basicauth-servlet.xml,  
           /WEB-INF/basicauth-security.xml
        </param-value>
</context-param>
<!-- Spring Security -->
<filter>
 <filter-name>springSecurityFilterChain</filter-name>
 <filter-class>org.springframework.web.filter.DelegatingFilterProxy</filter-class>
</filter>
<filter-mapping>
 <filter-name>springSecurityFilterChain</filter-name>
 <url-pattern>/*</url-pattern>
</filter-mapping>

Step3:

Create spring-security.xml file and add following code to enable the security for those url to which security needs to be enabled.

<?xml version="1.0" encoding="UTF-8" ?>
<beans xmlns="http://www.springframework.org/schema/beans"
 xmlns:xsi="http://www.w3.org/2001/XMLSchema-instance" 
 xmlns:oauth="http://www.springframework.org/schema/security/oauth2"
 xmlns:context="http://www.springframework.org/schema/context"
 xmlns:sec="http://www.springframework.org/schema/security" 
 xmlns:mvc="http://www.springframework.org/schema/mvc"
 xsi:schemaLocation="http://www.springframework.org/schema/security/oauth2 
 http://www.springframework.org/schema/security/spring-security-oauth2-2.0.xsd
 http://www.springframework.org/schema/mvc 
 http://www.springframework.org/schema/mvc/spring-mvc-3.2.xsd
 http://www.springframework.org/schema/security 
 http://www.springframework.org/schema/security/spring-security-3.2.xsd 
 http://www.springframework.org/schema/beans
 http://www.springframework.org/schema/beans/spring-beans-4.1.xsd
 http://www.springframework.org/schema/context 
 http://www.springframework.org/schema/context/spring-context-4.1.xsd ">
<http auto-config="true"  use-expressions="true" xmlns="http://www.springframework.org/schema/security">
    <intercept-url pattern="/login" access="permitAll" />
    <intercept-url pattern="/**" access="hasRole('ROLE_USER')" />
    <http-basic />
</http>
<authentication-manager alias="authenticationManager" xmlns="http://www.springframework.org/schema/security">
  <authentication-provider >
    <user-service>
      <sec:user name="apiuser" password="password" authorities="ROLE_USER"/>
    </user-service>
  </authentication-provider>
</authentication-manager> 
</beans>

cccc

Here is the explanation of the tags:

<http> - Main tag which is responsible for creating proxy for all the url which this tags intercepts.
<intercept-url> - this tag is for specifying the url's which needs to be behind access control and which doesnot need to have access control. Using attribute pattern you can specify Url pattern and access attribute specifies what access check needs to be implemented.
<http-basic> - This tag informs proxy that it needs to alert user to enter user and password when url is accessed. This adds a BasicAuthenticationFilter and BasicAuthenticationEntryPoint to the configuration.

<authentication-manager> - here type of authentication is specified, in above example i have used configuration based authentication, which means that user details are hardcoded in the same xml files.

Step4:

Create Java file for testing the following implementation. Below is the web service component which is behind basic authentication security.

package com.infoblog;

import org.springframework.stereotype.Controller;
import org.springframework.web.bind.annotation.RequestMapping;
import org.springframework.web.bind.annotation.RequestMethod;
import org.springframework.web.bind.annotation.ResponseBody;


@Controller
@RequestMapping(value="/secure")
public class SecureController {

 @RequestMapping(value="/test", method=RequestMethod.GET)
 public @ResponseBody String secureFunction(){
  
  return "Success";
 }
 
}


Step5:

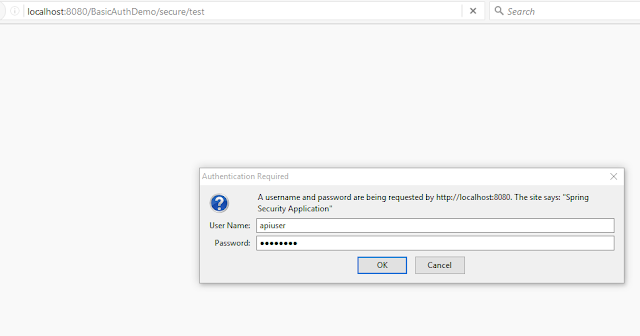
Start the server and test the functionality. Browser will prompt you to enter user details as shown below.


Wednesday, September 7, 2016

Parallel AJAX calls


Consider a scenarios where you have multiple source of data and that needs to be consolidated in the UI and presented to the users. There can be different ways to implement this. One option can be using AJAX approach. JQuery provides a way to initiate parallel AJAX calls. In this blog i will be showing a sample code to achieve same.

Using Jquery provided "$.when" function, which provides a way of executing asynchronous events. $.when takes asynchronous ajax events as a parameter, and the output of these AJAX events will return in ".then" in the same order.

$.when(ajax1, ajax2,....).then(resp1,resp2,....);


Following is the sample code to make parallel ajax call.
var url1="http://localhost:8080/url1";
var url2="http://localhost:8080/url2";
var param="s=abcd";

$.when(
 $.ajax({timeout:10000,error:function(){handleErrorScenario();},type: "get",
   url:url1, async : true, data:param}),
     $.ajax({timeout:10000,error:function(){handleErrorScenario();},type: "get",url:url2,
   cache: true,async : true, data:param})
 )
 .then(function(url1Resp, url2Resp){
    
 if(!url1Resp || !url2Resp){
  handleErrorScenario();//define this function.
 }else{
  handleSuccessScenario(url1Resp, url2Resp); //define this function.
 }
}

In the above sample there are two AJAX function which are passed as parameter. url1Resp and url2Resp will hold the output from the call. Code inside ".then" will be only executed when all the deferred AJAX response comes back. Some of the function needs to be defined in the your code. I am using them as dummy reference.

Saturday, September 3, 2016

Cross domain Calls in AJAX with Jsonp

Web browser doesnot allow initiating cross domain call from javascript. There are multiple ways to initiate cross domain calls, I will be showing example on how to make cross domain call from javascript using jsonp.


Using Jquery following is the way to initiate Cross Domain call.

in $.ajax method, "dataType" parameter should be set to "jsonp", here jsonp means Json with padding, with jsonp a javascript code
is injected in client browser, which enables code to make cross domain call.


function initiateCrossDomainCall(url) {
 $.ajax({
     dataType: 'jsonp', // json with padding
     type:"GET",
            url : url,
            success: function ( data) {
             parseResp(data);
            },
     error: function ( data, status, error) {
  parseErrorResp(data, status, error)
     },
            timeout: 2000
  });
}
function parseResp(data){
 //add code to parse responsedata.
}
function parseErrorResp(data, status, error){
 // parse errr response.
}

Basically when above javascript call is initiated from client, and dataType is mentioned as JSONP, then jquery by default adds a parameter to the url. parameter name will be "callback" and name of the method will dynamically generated by jquery. Server response should be wrapped inside this method.. e.g. in the below url call, you can see the callback=jQuery11230083279708298031_1472922945432, "jQuery11230083279708298031_1472922945432" this is the function name in which response should be wrapped and sent back from the server side code.

http://localhost:8080/location?callback=jQuery11230083279708298031_1472922945432&_=1472922945433

Incase if custom callback method is defined in $.ajax method then jquery will send that method name in the "jsonpCallback" parameter. something like this. jsonpCallback:'handleResp' in the url call you can see the callback=handleResp is passed.

http://localhost:8080/location?callback=handleResp&_=1472922945433

To make the server side code support jsonp approach, following should be the logic on server side code. Sample code in java with spring. but this can be done in any framework with similar output.
@RequestMapping(value="/location", method=RequestMethod.GET)
public @ResponseBody String returnLocation(HttpServletRequest request){
 //reading callback paarameter
 String callback = request.getParameter("callback");
 StringBuilder sb=new StringBuilder();
//preparing response based on if callback parameter is present or not.
 if(callback!=null){
  //appending callback method name and adding json response inside that method.
 sb.append(callback).append("(").append("{\"location\":").append("BL").append("})");
 }else{
 sb.append("{\"location\":").append("BL").append("}");
 }
 return sb.toString();
}
following is the response from the server to the jsnop call.

  jQuery11230083279708298031_1472922945432({"location":"BL"})

 once the client browser receives the above response it calls back the success block of the $.ajax function and executes either "parseResp" or "parseErrorResp" method based on success or error.

that is all from jsonp.

Tuesday, November 20, 2012

Using Interceptor in Websphere Portal and Spring Portlet 3.0

Spring has come up with Spring Portlets for websphere portal. There are lot of documentation available which talks about integration steps for Spring and websphere portal. But i struggled to find how to use interceptor with spring portlet 3.0.

I have used Spring with J2EE applications and using interceptor was very straight forward. We need to put entry in springContext.xml file and map all the controller who needs to use this interceptor.

For Spring portlet there are different steps which you need to do to configure Interceptor.

  Follow the below steps:

1. Create Interceptor class in your project. check the sample interceptor code below. 

package com.custom.interceptor;
import javax.portlet.PortletRequest;
import javax.portlet.PortletResponse;
import javax.portlet.PortletSession;
import org.springframework.beans.factory.annotation.Autowired;
import org.springframework.web.portlet.ModelAndView;
import org.springframework.web.portlet.ModelAndViewDefiningException;
import org.springframework.web.portlet.handler.HandlerInterceptorAdapter; 
public class YourInterceptorImpl extends HandlerInterceptorAdapter {
    @Override
    protected boolean preHandle(PortletRequest request,PortletResponse response, Object handler) throws Exception {
        System.out.println("Inside Prehandle method");
        //business logic
    }
// there are other method which we can use based on when you want to //execute the logic.
} 

2. Locate applicationname-portlet.xml file and below code in the file.

<bean id="customInterceptor" class="com.custom.interceptor.YourInterceptorImpl" />    
<bean class="org.springframework.web.portlet.mvc.annotation.DefaultAnnotationHandlerMapping">
<property name="interceptors">
    <list>
        <ref bean="customInterceptor" />
    </list>
</property>
</bean>

3. Restart server and access in via browser.

You should see in console "Inside Prehandle method" message. You can add the business logic which needs to be executed before any logic in controller gets executed.


Tuesday, July 19, 2011

Playing video using html5

                    Prior to HTML 5 it was difficult to write code for playing video. Developer used to write code based on browser types and OS. In HTML 5 new tag has been introduced to support videos. Its very straight forward to use not much of coding involved in using it.


<video id="myVideo" poster="start.jpg" autoplay="autoplay" width="100px" height="150px"
    audio="muted" loop="loop" controls="controls" src="video.mp4" preload="auto">
</video>

Attribute                                   Description
autoplay=autoplay                     If present, then the video will start playing as soon as it is ready
poster=url                                 URL of image which should be shown when video is not playing.
preload=auto/metadata/none     Video should be loaded when the page loads. This value is ignored if                                                       autoplay is true. auto: loads complete video,
                                                  metadata: only metadata of video gets loaded, none: nothing will be loaded.
src=url                                      Location of video file. Additional Source tag also can be used to specfiy the                                                   video source file.
                                                         <source src="video.mp4" type="video/mp4"/>
width=pixels                             Specifies the width of video player window.
height=<NUM>pixels               Specifies the height of video player window.
controls=controls                      Displays the different controls, like play button, previous, next controls.
audio=muted                             If muted value given means video will start in mute mode.
loop=loop                                Video will start over again, every time it is finished

<source src="video.mp4" type="video/mp4" />

src=url                                      Location of video file.
type:MIME Type                      Specify the MIME type of the video file. e.g. video/mp4 etc
  
<video id="myVideo" poster="start.jpg" autoplay="autoplay" width="100px" height="150px"
    audio="muted" loop="loop" controls="controls" preload="auto">
<source src="video.mp4" type="video/mp4" />   
</video>

Limitations:
1. Can only be played in Latest Browsers which supports html 5.

Browser Support:

Internet Explorer Firefox Opera Google Chrome Safari

Friday, July 15, 2011

Client Side performance Improvement Opportunities

Many of the web application face major challenge for performance. There are various ways to improve performance of the website. It can be Server Side Code Improvement (e.g. code analysis and refactoring, db side changes etc), Hardware Side (improve on hardware configuration, increasing number of servers etc) and Client Side. When  i say client side here i mean User Interface (such as Image, JS, css etc). I am going to explain in this article about various opportunities for performance improvements from Client side. This is not very exhaustive list but some of the items which can be controlled and taken care easily.

o Avoid complete page refresh wherever possible. You can use AJAX calls. This way we can reduce amount of the network data to be transferred and complete page refresh.

o Use "GET" for AJAX request where ever possible if data being transferred is not sensitive, amount of data is less, or you are getting data from server. Reason behind this is POST request creates two connections for single submit one for header and other for body. But GET does this task in single connection. Get performs better then POST request.

o Minify the JS/CSS file. This will reduce the JS/CSS file size, which will be downloaded faster from server. Minifying JS/CSS removes unnecessary blank lines, comments. Which helps in reducing the file size. Less file size means less data to be downloaded from server.

o Reduce the number of js/css file, combine them in single and use them. Less number of file mean fewer HTTP request to server for downloading them.

o Optimize the image file. This process will reduce the image file size by little compromise on quality of the image. Check in Google there are online image optimizer available e.g.  http://tools.dynamicdrive.com/imageoptimizer/

o Put css in top and java script at the bottom of the code.

o Specify dimensions that match those of the images themselves. Create image of required size and use them rather than fixing size using height and width attribute in <img height="100px" width="100px" /> tag. E.g. if your application needs 100X100 image and you have same image but of different height X width say 300X300 than don’t set height and width to 100X100 in image tag for your need. Create image of required size and use it. This is because browser still downloads bigger size image.

o Specifying a width and height for all images allows for faster rendering by eliminating the need for unnecessary reflows and repaints. But make sure above point is taken care when you specify the image height and width.

o Avoid empty image tag. E.g. <img src="" /> or var img=new Image(); img.src="";

o Use png image on top of gif images.

o Use pngcrush to optimize the image before using them. http://pmt.sourceforge.net/pngcrush/

o Avoid 404 errors, this means make sure there are no reference to missing files in your jsp.

o Use Image Sprite. Image Sprite is collection of many images into single image. This way only one server call will be made and many images can be downloaded. Using css we can render the images from sprite image. There are websites using which you can generate css for sprite images. e.g. http://www.spritebox.net/
below image is sprite image, where two images are combined in single image.


below css will split the image into two separate image.
img.im1{width:51px;height:32px;background-position:-1px -1px;background-repeat:no-repeat;background:url(sprites.JPG); }
img.im2{width:52px;height:33px;background-position:-54px -1px;background-repeat:no-repeat;background:url(sprites.JPG); }


you need to use these class in <img> tag as shown below:
<img class="im1" src="img_trans.gif"  width="1" height="1" />
<img class="im2" src="img_trans.gif" width="1" height="1" />
here src is one transparent image, this is required to be mentioned... below is snap how it comes in browser.


Tuesday, July 5, 2011

AJAX Integration with DOJO

 Dojo is an open source framework which provides various inbuilt functions for AJAX, Widgets, Events, and Effects etc. These functions make life easier for the developer. They provide complete abstraction from the complexity involved behind the scene. I am going to cover AJAX feature provided by Dojo in this article.
Normally when we code for AJAX we think of creating request, forming the data which needs to be sent to server, error handling, timeout scenarios, response handling etc. We can’t escape from any of these points when we write coding and due to this code becomes complex and cumbersome to understand and maintain. Dojo provides cleaner and easier approach to create a code for handling AJAX calls.
Dojo Basics:
Two types of request are sent to server for any AJAX request, Post and Get. Dojo provides two function for these two types dojo.xhrGet and dojo.xhrPost methods. These two functions have all the AJAX capabilities in built. It takes care of creating request, forming the data which needs to be sent to server, error handling, timeout scenarios, response handling etc.
dojo.xhrGet({
    url: "/pojoProj/ dojoCall.jsp",
    load: function(result) {
        alert(result);
     }
});

                There are various arguments available for these functions, I have shown below how to use them while coding and their description.

dojo.xhrGet({ // Function Name, this can be dojo.xhrGet/ dojo.xhrPost
// url, This is the Server URL to which AJAX request will go.
                url: "/pojoProj/search.jsp",
                // content, This is the parameter which will be passed to above URL,  to access these parameter use normal request.getParameter(“studentName”). Based on type POST/GET parameter will be send to server either as post data or url string.
                content: {                           
studentName: dojouser,
                                class: 12,
                },
//timeout, This value is milliseconds; request will wait for specified time than after that it will treat as failure.                               
                timeout: 10000,

                //
                form: dojo.byId(<<formName>>),

                //load is called after successful response.  This function will not be called in case of any error or exception.
load: function(resp) {
                                if(<<condition>>){
                                                <<actions>>
                                }else{
                                                <<actions>>
                                }
                },
                // The error handler, this function will be called in case of failure. You can use first argument to display error message if there are any.
                error: function(errorMessage) {
                                alert(errorMessage);
                },
// handle will be called always, in case of success and failure of the request.
                handle: function (response, ioArgs) {
                                alert("hello");
                }
});

Create web project and create two jsp for testing below code. Below example is only for plain text response, in coming blogs i will explain different ways of handling the response like JSON, XML...
Complete Code Sample:
Index.jsp:
<html>
<head>
<meta http-equiv="Content-Type" content="text/html; charset=ISO-8859-1">
<title>Insert title here</title>
<script language="javascript" src="js/dojo/dojo_uncompressed.js"></script>
<script>
function findStudent() {
                var stdName=dojo.byId("stdId").value;
                dojo.xhrGet({
                                url: "/dojo_json_sampleapp/dojoCall.jsp",
                                content: {
                                                stdname:stdName
                                },                                            
                                timeout: 10000,
                                load: function(resp) {
                                if(resp.trim() != ""){
                                                dojo.byId("respNode").innerHTML = stdName+" is in "+resp;
                                }else{
                                                dojo.byId("respNode").innerHTML = "Student detail is not available for "+stdName;
                                }
                                },
                                error: function(errorMessage) {
                                                alert(errorMessage);
                                }
                });
}

dojo.ready(function(){
                dojo.connect(dojo.byId("stdId"),"onkeyup",findStudent);
});
</script>
</head>
<body>
                Student Name: <input type="text" name="studentName" id="stdId" value="" />
                <p>Student Details: <span id="respNode"> </span></p>
</body>
</html>

Search.jsp
<%
if("pojo1".equals(request.getParameter("stdname"))){
      System.out.println(" 11111 ");
      out.print("4th standard");
}else if("pojo2".equals(request.getParameter("stdname"))){
      System.out.println(" 22222 ");
      out.print("5th standard");
}else{
      System.out.println(" 33333 ");
      out.print("");
}
%>

You can download the dojo js file from this url:  http://dojotoolkit.org/

Important Notes:
1. Use get method if you don't have large data to be submitted to server and if you are retrieving data from the server. As get creates only one connection to the server for complete request. Post creates two connection one for header and one for body. You will have better performance in Get.


Monday, June 27, 2011

String and String Buffer Comparison

Thinking java String concatenation internally uses StringBuffer to do the concatenation operation, we do concatenation as mentioned below in java code,


String str=a+b; a and b is string objects.


java compiler compiles above code in this fashion:


String str=(new StringBuffer()).append(a).append(b).toString());

    Above code creates two objects, and as you must be knowing that java maintains the string data in char array which is also an object so it creates 1 more object. So in total 3 objects gets created for one concatenation operation. Please note that object creation is one of the costliest operation in java.

    I created one test program just to see the performance difference and results were dramatic... i ran both loop in same program 1 million times. See the time difference... So based on below result its  recommended to use StringBuffer.append whenever you are doing any concatenation operation in java...

    time taken by string: 78080 (ms)
    time taken by String buffer: 31 (ms)


Components of Big Data - Hadoop System

In this blog i will explain important components which are part of Hadoop System. I will give very brief overview of these components. Be...