Wednesday, August 31, 2016

Configure Quality Gates in SonarQube Server

In this blog i will show how to configure Quality Gates in SonarQube server.

What is Quality Gate?
   Quality Gate is combination of various conditions, against which SonarQube server measures project quality thresholds. There are different categories/severity of issue which sonar reports, like Critical, Blocker, Major, Code Coverage, blocker issues since last build and many others.

Before I explain further, let me explain when need arises to create custom quality gates.

   Sonarqube works with many technologies, all these technologies will have different standard and process. And measuring criteria can't be same for all these applications, in such scenarios different Quality Gates will be needed for each of these projects/application.

   Now moving on with the Quality Gate creation process.

   Login to SonarQube server, for me it is hosted at "http://localhost:9000/", incase it defers then access the url on which sonarqube server is hosted.

  Login to sonarqube portal, click on Menu "Quality Gates" in top menu bar.


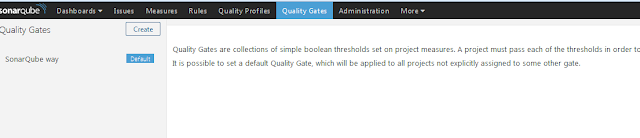
Sonar will show default Quality Gate which comes with Sonar setup.

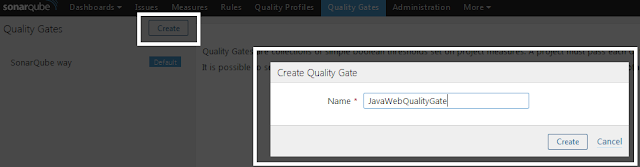
To create new Quality Gate, click on "Create" button in left navigation. Enter quality gate name and click on Create button in the popup.


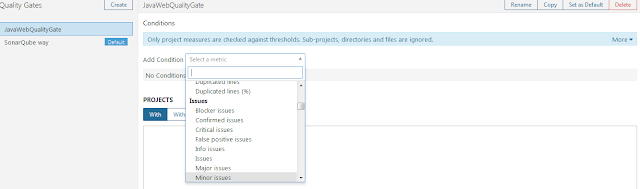
Click on "Add Condition" drop down and select the appropriate metrics specific to project requirement.


after adding the conditions, select following details for each row.


  • First Drop Down - select the value
  • Second Drop Down - select the condition
  • Warning Field Value- value
  • Error Field Value - enter value
Next will click on "Add" button. It will add the metrics to QualityGate. There are many metrics which is provided in the dropdown, select based on the project needs.


After above step, project needs to be associated to Quality Gate.

In below project display area on the same screen, search for the project and select the checkbox, which will associate the project to created Quality Gate.


This is last step in creation of Custom Quality Gate.

For the above project if new build is initiated then it will validate the project against this quality gate. That can be verified in logs.


Configure SonarQube with Jenkins

   Jenkins provides easy integration with different kinds of plugins which are helpful in overall improvement and management of development life cycle and code quality. One of such plugin is SonarQube.

    SonarQube is code quality analysis software. It runs through the code and identifies code quality issues. It has got web portal where you can generate different kinds of reports like

  1. Technical Debt
  2. Code Issue, with actual code linkage.
  3. Different types of reports.
  4. Maintains the history of issue details. Can check increase and decrease.
  5. Rules configuration.
  6. Quality Gates
  7. Code duplication
  8. and Many others.
    There is provision in Jenkins to integrate this plugin, which can be executed during the building of applications. Also there is option of failing the build process if the code quality does not match the defined quality gate in Sonar.

  Now i will show how to integrate this plugin with Jenkins. Assumption is that Jenkins is installed in your system. 

  To start first you need to download sonar server in your system or if it already installed and running then you can skip this step.

If Sonar is not installed then follow these steps.
  1. Download SonarQube from the link.
  2. After download, unzip the file in your system.
  3. Then to start SonarQube server, navigate to "SONAR_HOME/bin".
  4. Based on your environment, go to specific folder.
  5. I am using "windows-x86-64" as i am having Windows, 64Bit system. 
  6. Click on "StartSonar.bat" to start the sonar server.
  7. Sonar server should start, and you will see new command prompt window opening for you.
  8. Sonar can be added into window service as well if you are system admin. There batch files present in same folder.
  9. Access the SonarQube in WebBrowser by entering url: "http://localhost:9000/"
  10. Empty dashboard page of sonar server if it is fresh installation.
  11. Once page is launched, it means that sonar is installed and running fine.
  12. Please note this server url will be used in Jenkins when we install SonarQube plugin in coming sections below.
following message in the console tell if sonar server is up and running.
jvm 1    | 2016.08.30 23:02:43 INFO  app[o.s.p.m.Monitor] Process[web] is up


Now coming back to configuring SonarQube in Jenkins.

1. Access jenkins portal by accessing "http;//localhost:8080" url in browser.

2. Go to --> Manage Jenkins menu in left navigation. Then click on "Manage Plugins",


3. Navigate to "Available" Tab, in the "Filter" option, type "SonarQube", you will see "SonarQube Plugin" listed below, select the checkbox and click on "Download now and install after restart" button.


4. Following screen will be shown, restart Jenkins, plugin will be installed and it can be verified in installed Tab under Manage Plugin page.


5. After installation next step will configure SonarQube Plugin.

6. Navigate to "Manage Jenkins" --> "Configure System", look for section named "SonarQube", as shown below.

7. Provide basic  details, like Name, and Server Url, This URL should be the url for SonarQube Server which we installed above.


8. Once the global configuration is complete, next step will be to configure SonarQube for a specific projects. I will show next.

9. Navigate to Jenkins Home, by clicking on Jenkins menu in horizontal menu bar.

10. Next click on "New Item", you will get following screen, provide details of the project. Here we are creating new project which will be mapped to a java project.

  • Item Name
  • Select Freestyle Project
Click on OK button.


11. It will launch detailed project screen, where project related information can be configured, like SCM, and other configuration. These points is out of scope of this blog.

12. Now to add Sonar configuration to the project, click on "Add Build Step" and click on "Invoke Standalone SonarQube Analysis" menu. it will expand a new section specific to SonarQube configuration.


13. Provide the details for project configuration related to sonar server.

Values inside "Analysis properties" are important for sonar server.

  • sonar.projectKey - This will be used to uniquely identify project in sonar server, ensure that this does not repeat if you have multiple project in Sonar Server. Otherwise it will override the project data.
  • sonar.projectName - Project will be given in sonar server.
  • sonar.projectVersion - Usefull in maintaining history of the changes.
  • sonar.sources - folder where source code files are present.
  • sonar.language- language of the source code.


14. Once values are entered, then click on "Save" button.
15.  Now setup is complete for the project.
16. Next is to start Build process and verify if sonarqube analysis is getting triggered or not. Click on "Build Now" in project left navigation.


17. Once build starts, then monitor the logs in Jenkins console. You will see following logs. this mean SonarQube analysis is getting triggered and it is getting tracked in sonar server also.


18. To check project in SonarQube server, navigate with following link given in above console. you will see below screen.


That is all which needs to be done for configuring sonarqube in jenkins.

Saturday, August 27, 2016

How to change log level in logback at runtime

Here i am going to show how to change the log level in logback logging api at runtime.

Following are the possible log level available in logback.
  • TRACE
  • DEBUG
  • INFO
  • WARN
  • ERROR
Below is the set of code if it gets executed will changes the level to the one it is being set. First retrieve the LoggerContext using LoggerFactory, then retrieve the root logger or you can retrieve any specific logger as well. After getting the rootLogger then call setLevel method to specify the new log level.
  LoggerContext loggerContext = (LoggerContext)LoggerFactory.getILoggerFactory();
  Logger rootLogger = loggerContext.getLogger(Logger.ROOT_LOGGER_NAME);
  ((ch.qos.logback.classic.Logger) rootLogger).setLevel(Level.DEBUG);

Wednesday, August 24, 2016

Setting in Tomcat to enable SSL for certain pages

Use following setting in your web application to enable SSL for certain pages.


For example:
Certain page in the application should be accessible on https, like

SSL:

Non SSL:

This setting can be enabled at application level by specifying appropriate configuration in deployment descriptor file i.e. web.xml.

Open web.xml located inside WEB-INF folder in application. Add following code

<security-constraint>
    <web-resource-collection>
        <web-resource-name>Non SSL</web-resource-name>        
        <url-pattern>/help</url-pattern>
  <url-pattern>/contact</url-pattern>
    </web-resource-collection>    
    <user-data-constraint>
        <transport-guarantee>NONE</transport-guarantee>
    </user-data-constraint>   
</security-constraint>
<security-constraint>
    <web-resource-collection>
        <web-resource-name>SSL</web-resource-name>        
        <url-pattern>/*</url-pattern>
    </web-resource-collection>    
    <user-data-constraint>
        <transport-guarantee>CONFIDENTIAL</transport-guarantee>
    </user-data-constraint>
</security-constraint>

url-pattern - here you need specify the url pattern to be considered.

transport-guarantee - value in this tag manages if the mentioned url under url-pattern should be under SSL or Non SSL. if "CONFIDENTIAL" value is specified then it will be secure otherwise non SSL.


Apache Tomcat SSL and TLS configuration

This blog will explain how to enable SSL on Tomcat7.x server on Linux.

Step1: Generation of Key file.

How to generate the key file using OpenSSL.

Prerequisites:
  • OpenSSL
Run following command to generate the key file.

openssl genrsa -out myapp.key 2048

output of this command will be "myapp.key" file on current directory, if you want to create this file in different directory, you can specify the file name with the path. Last parameter is for size of the key to generate. I have used 2048 which is considered to be secure. But you can use 4096 or lesser values based on your need.

openssl genrsa -out /app/key/myapp.key 2048

Step2: Generation of CSRfile.

Once you get the key file you need to generate the CSR file for getting the signed public certificate.

For generating the CSR use following command.

openssl req -new -key app.key -out myapp.csr

Step3: Generation of public certifcate

  After generating the CSR file, get the certificate generated. And once you receive the public certificate you need to do following steps. In my case I received myapp.cer file.

Step4: Create PKCS12 keystore from private key and public certificate.

I executed following command for adding my private key and the certificate to the keystore file. Using openssl command.

openssl pkcs12 -export -name myservercert -in /app/cer/myapp.cer -inkey /app/key/myapp.key -out /app/keystore/keystore.p12

Step5: Convert PKCS12 keystore into a JKS keystore.

I executed following command for adding my private key and the certificate to the jks keystore file.

keytool -importkeystore -destkeystore /app/keystore/myappkeystore.jks 
-srckeystore /app/keystore/keystore.p12 -srcstoretype pkcs12 -alias myservercert 

Now after generation of jks keystore, next step will be to configure tomcat server to enable SSL.

Step6: Change in <TOMCAT_HOME>/conf/server.xml

uncomment the <connector> related to SSL

<!-- Define a SSL HTTP/1.1 Connector on port 8443
     This connector uses the BIO implementation that requires the JSSE
     style configuration. When using the APR/native implementation, the
     OpenSSL style configuration is required as described in the APR/native
     documentation -->
<Connector SSLEnabled="true" clientAuth="false" keyPass="changeit" keystoreFile="conf/myappkeystore.jks" 
  keystorePass="changeit" keystoreType="JKS" maxThreads="150" port="8443"  protocol="HTTP/1.1" scheme="https" secure="true" sslProtocol="TLS"/>


Monday, August 22, 2016

How to persist password in Spring Authenticator Object

In this short blog I will show a small change in configuration which will persist password in spring org.springframework.security.core.Authentication object.

It is not best practice to keep password in object after authenticating the user, but in case if you want to persist the password then following is the code which needs to be added in spring application configuration.

For the "authentication-manager" tag you need to add "erase-credentials" attribute and set the value to false. Below is code snippet:


<security:authentication-manager  erase-credentials="false">
  <security:authentication-provider ref="AuthenticationProvider"/>
 </security:authentication-manager>
Hope this will be useful.

Saturday, August 20, 2016

Role Based access to Method with Spring Security @PreAuthorize


In this blog i am going to show how to implement role based method permission with Spring Security. Here i am showing "@PreAuthorize"  and its integration,

 To start with let me show you the dependencies which needs to be there in your project to start. I am using spring Spring 4.x. Apart from basic spring jars you need to have following jar which is specific to spring security in your project.
  1. spring-security-config jar
  2. spring-security-core jar
  3. spring-security-web jar


Once these jar files are added to the project, following changes needs to be done in step wise manner to better understand their purpose and understanding.

Step1:
  Add following code to applicationContext.xml or configuration file which you are using.

Add namespace details in xml file.

xmlns:security="http://www.springframework.org/schema/security"
xsi:schemaLocation="http://www.springframework.org/schema/security
           http://www.springframework.org/schema/security/spring-security-4.0.xsd"
Add following bean tags to enable security feature
<security:global-method-security pre-post-annotations="enabled">
  <security:expression-handler ref="expressionHandler"/>
</security:global-method-security> 
<bean id="expressionHandler" class="org.springframework.
security.access .expression.method.DefaultMethodSecurityExpressionHandler">
     <property name="permissionEvaluator" ref="permissionEvaluator"/>
</bean>  
<bean id="permissionEvaluator" class="com.sample.security.SampleMethodPermissionEvaluator"/>

security:global-method-security:  This tag will enable method level security using spring configuration.
expressionHandler :This parameter will be mapped to class "DefaultMethodSecurityExpressionHandler" out of the box provided by spring.
This bean will take property named permission evaluator this property will take reference for custom Method evaluator which will have method to validate the access role.

Step2: Create Method evaluator class which will have method to validate the role permission.
package com.sample.security;

import java.io.Serializable;

import org.springframework.security.access.PermissionEvaluator;
import org.springframework.security.core.Authentication;
import org.springframework.security.core.GrantedAuthority;

public class SampleMethodPermissionEvaluator implements PermissionEvaluator {

 public SampleMethodPermissionEvaluator() {
  super();
 }

 @Override
 public boolean hasPermission(Authentication authentication, Object targetDomainObject, 
Object exeMethodRole) {
  boolean hasPermission = false;
  if (authentication != null && exeMethodRole != null && exeMethodRole instanceof String) {
   for (GrantedAuthority auth : authentication.getAuthorities()) {
    if (exeMethodRole.equals(auth.getAuthority())){
     hasPermission = true;
     break;
    }else {
     hasPermission = false;
    }
   }
  }
  return hasPermission;
 }
 @Override
 public boolean hasPermission(Authentication authentication, Serializable targetId, String targetType,
   Object exeMethodRole) {
  throw new Exception("Not supported by this application");
 }
}  

hasPermission method in the above class will have permission check, you need to ensure that Authentication object is available in context. So that it is available to the method.

Step3: Add the following line to any of the interface methods.
@PreAuthorize("hasPermission(#user,'admin')")
Here is sample code.
@PreAuthorize("hasPermission(#user,'admin')")
 boolean createUser(String userDetails);

#user will be populated with the Authentication object by spring framework. Second parameter is the role which is allowed for the method.

You are good to go, start your application and test the method access. If logged in user does not have permission then it will throw "AccessDeniedException", this you need to handle and show proper message to the user.


Components of Big Data - Hadoop System

In this blog i will explain important components which are part of Hadoop System. I will give very brief overview of these components. Be...